Interchangeable Virtual Instruments (IVI) is a standard for instrumentation drivers that is designed to reduce the time and effort needed to integrate measurement devices into new or existing systems. It does this by providing a standard application programming interface (API) that defines common measurement functions. This is, in turn, provided by a standard set of shared components that must be used by all compliant drivers and ancillary software. These components provide services to drivers and driver clients that need to be common to all drivers.
IVI drivers can be written for both Windows and Linux systems, enabling multi-platform support of hardware. On Windows systems, IVI drivers allow calls to an instrument through a Dynamic Link Library (DLL). This means that any programming language that supports DLL calls, including Python, can be used to control instrumentation.
VTI Support for Python
If you wish to use Python to control instrumentation using VTI Instruments' IVI-COM drivers on a Windows system, you must first download the comtypes Python module. Comtypes allows you to define, call, and implement custom and dispatch-based COM interfaces in pure Python. It works on Windows, 64-bit Windows, and Windows CE. More information about the Python comtypes package can be found at http://pythonhosted.org/comtypes/. You will also need the IVI Foundation's IviSharedComponents driver.
Note that if your drivers are only 32-bit drivers, then you must use 32-bit Python. In this example, we are using the 32-bit version of Python 2.7 on a 64-bit version of Windows 10.
Controlling a switching system
For this example, we will show you how to control a switching system built around EX1200 Series switching modules. The IVI drivers for these modules are free to download from the VTI web site. When using an EX1200 system with other cards may also want to download the appropriate drivers for those cards.
Each driver comes with a help file. The help file for the switch driver, for example, is found at: C:\Program Files (x86)\IVI Foundation\IVI\Drivers\VtexSwitch\VtexSwitch.chm. This file covers all function calls of the driver.
After installing the IVI drivers, Python 2.7.11 and comtypes 1.1.3, open the command prompt, go to the python 2.7 installation folder and execute Python.
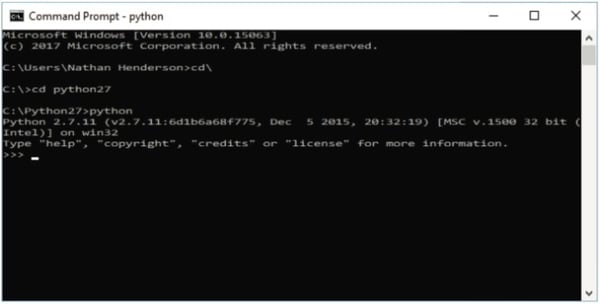
Next, type the following:
- >>>from comtypes.client import CreateObject;
- This call exposes functions that allow the creation or access to COM objects. Here we create a COM object and return an interface pointer to it.
- >>> driver = CreateObject("VTEXSwitch.VTEXSwitch");
- Instantiate the driver by creating the VTEXSwitch object and return an interface pointer to it.
- >>> driver.Initialize("TCPIP::192.168.0.19::INSTR",False,False,"");
- Initialize the device using the VTEXSwitch driver
Initializing the device using the VTEXSwitch driver is very much like the C++ IVI-Com call: Switch->Initialize("TCPIP::192.168.0.16::INSTR", VARIANT_TRUE, VARIANT_TRUE, "");
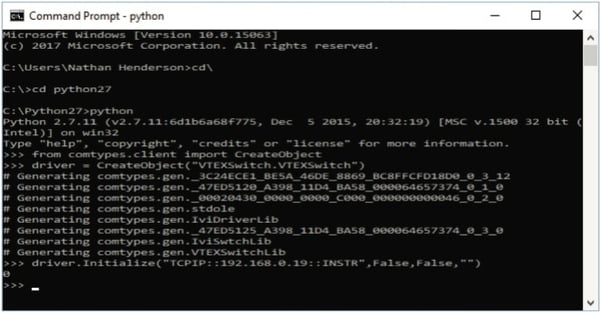
As you can see, the returned status is 0, meaning that the instrument was initialized successfully. The “Generating” messages will only appear on the first run of this command, or after an update of the VTEXSwitch driver.
At this point we have now initialized the driver and connected to the hardware. You can now control the hardware from this point forward. To close a switch path, type:
driver.Path.Connect(“1!CH1_1”,”1!CH1_COM”)
If this command returns a status of 0, the command has been successfully executed.
This is, of course, a very simple example, but you can see how easy it is to control VTI instrumentation using IVI drivers and Python. For more information about using IVI drivers and other VTI products, phone 949.955.1894 or send an email to vti.sales@ametek.com.